Warning
The documentation here may not directly apply to your version of Flight, locate your version of Flight here
Working with data and files
Organising data on your cluster
Your home directory
The shared filesystem includes the home-directory area for the user you created when your cluster was launched. Linux automatically places users in their home-directory when they login to a node. By default, Flight Compute will create your home-directory under the /home/ directory, named after your username. For example, if your user is called jane, then your home-directory will have the absolute path /home/jane/.
The Linux command line will accept the ~ (tilde) symbol as a substitute for the currently logged-in users’ home-directory. The environment variable $HOME is also set to this value by default. Hence, the following three commands are all equivalent when logged in as the user jane:
ls /home/janels ~ls $HOME
The root user in Linux has special meaning as a privileged user, and does not have a shared home-directory across the cluster. The root account on all nodes has a home-directory in /root, which is separate for every node. For security reasons, users are not permitted to login to a node as the root user directly - please login as a standard user and use the sudo command to get privileged access.
Local scratch storage
Your compute nodes have an amount of disk space available to store temporary data under the /tmp mount-point. The size of this area will depend on the type and size of instance you selected at the time your cluster was launched. This area is intended for temporary data created during compute jobs, and shouldn’t be used for long-term data storage. Compute nodes are configured to clear up temporary space automatically, removing orphan data left behind by jobs. In addition, an auto-scaling cluster may automatically terminate idle nodes, resulting in the loss of any files stored in local scratch space.
Users must make sure that they copy data they want to keep back to the shared filesystem after compute jobs have been completed.
Copying data between nodes
Flight Compute cluster login and compute nodes all mount the shared filesystem, so it is not normally necessary to copy data directly between nodes in the cluster. Users simply need to place the data to be shared in their home-directory on the login node, and it will be available on all compute nodes in the same location.
If necessary, users can use the scp command to copy files from the compute nodes to the login node; for example:
scp ip-10-75-0-235:/tmp/myfile.txt .
Alternatively, users could login to the compute node (e.g. ssh ip-10-75-0-235) and copy the data back to the shared filesystem on the node:
ssh ip-10-75-0-235
cp /tmp/myfile ~/myfile
Copying data files to the cluster
Many compute workloads involve processing data on the cluster - users often need to copy data files to the cluster for processing, and retrieve processed data and results afterwards. This documentation describes a number of methods of working with data on your cluster, depending on how users prefer to transfer it.
Using command-line tools to copy data
The cluster login node is accessible via SSH, allowing use of the scp and sftp commands to transfer data from your local client machine.
Linux/Mac
Linux and Mac users can use in-built SSH support to copy files. To copy file mydata.zip to your cluster on IP address 52.48.62.34, use the command:
scp -i mykeyfile.pem mydata.zip jane@52.48.62.34:.
- replace
mykeyfile.pemwith the name of your SSH public key - replace
janewith your username on the cluster
Windows
Windows users can download and install the pscp command to perform the same operation (for this you will need your .pem key in .ppk format, see connecting from Windows with Putty):
pscp -i mykeyfile.ppk mydata.zip jane@52.48.62.34:/home/jane/.
SCP/PSCP
Both the scp and the pscp commands take the parameter -r to recursively copy entire directories of files to the cluster.
To retrieve files from the cluster, simply specify the location of the remote file first in the scp command, followed by the location on the local system to put the file; e.g.
To copy file myresults.zip from your cluster on IP address 52.48.62.34 to your local Linux or Mac client:
scp -i mykeyfile.pem jane@52.48.62.34:/home/jane/myresults.zip .
Using a graphical client to copy data
There are also a number of graphical file-management interfaces available that support the SSH/SCP/SFTP protocols. A graphical interface can make it easier for new users to manage their data, as they provide a simple drag-and-drop interface that helps to visualise where data is being stored. The example below shows how to configure the WinSCP utility on a Windows client to allow data to be moved to and from a cluster.
- On a Windows client, download and install WinSCP
- Start WinSCP; in the login configuration box, enter the IP address of your Flight Compute cluster login node in the
Host namebox - Enter the username you configured for your cluster in the
User namebox - Click on the
Advancedbox and navigate to theSSHsub-menu, and theAuthenticationitem - In the
Private key filebox, select your AWS private key, and click theOKbox.
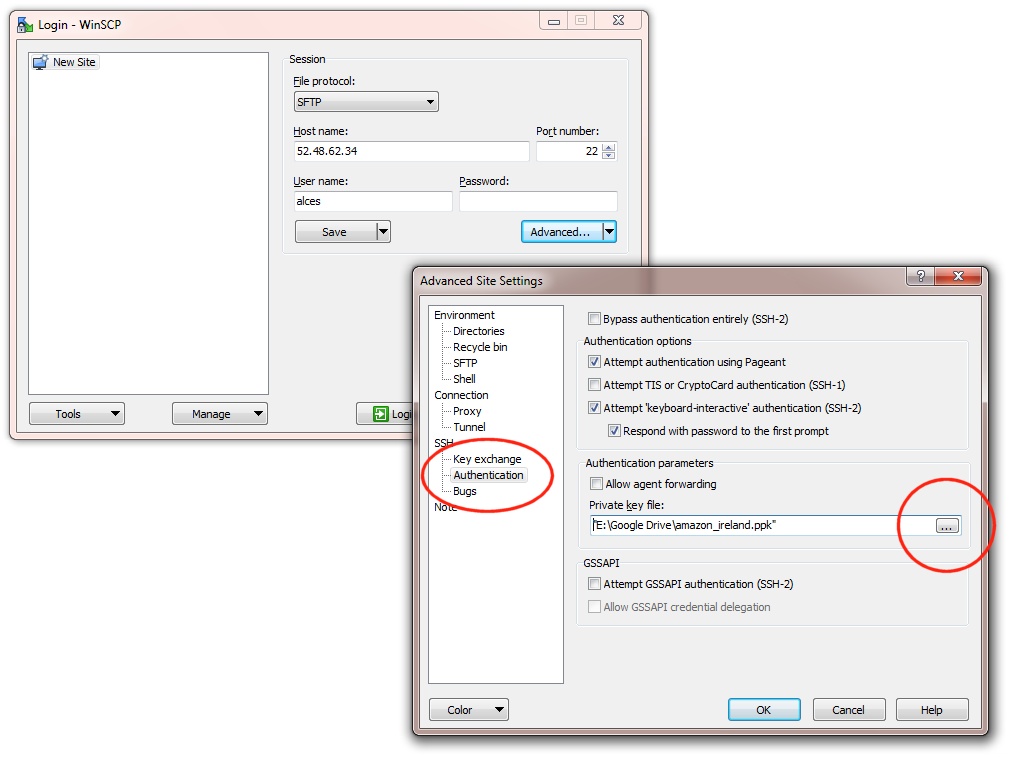
- Optionally click the
Savebutton and give this session a name - Click the
Loginbutton to connect to your cluster - Accept the warning about adding a new server key to your cache; this message is displayed only once when you first connect to a new cluster
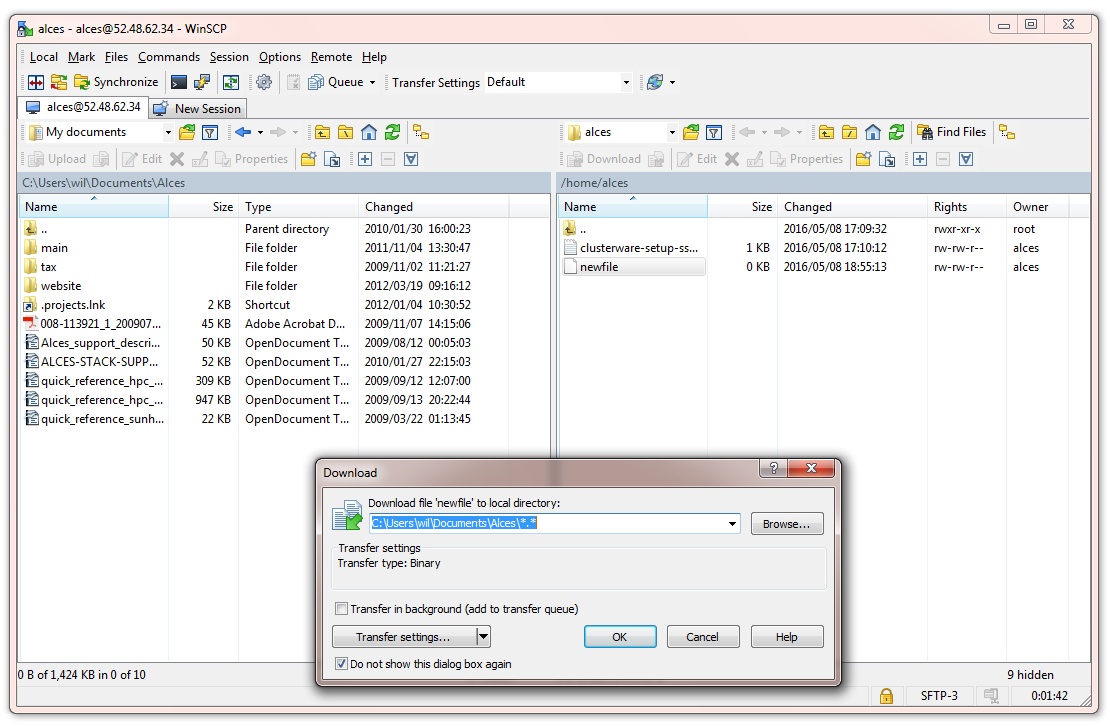
- WinSCP will login to your cluster; the window shows your local client machine on the left, and the cluster on the right
- To copy files to the cluster from your client, click and drag them from the left-hand window and drop them on the right-hand window
- To copy files from the cluster to your client, click and drag them from the right-hand window and drop them on the left-hand window
The amount of time taken to copy data to and from your cluster will depend on a number of factors, including:
- The size of the data being copied
- The speed of your Internet link to the cluster; if you are copying large amounts of data, try to connect using a wired connection rather than wireless
- The type and location of your cluster login node instance
Object storage for archiving data
As an alternative to copying data back to your client machine, users may prefer to upload their data to a cloud-based object storage service instead. Flight Compute clusters include tools for accessing data stored in the AWS S3 object storage service, as well as the Dropbox cloud storage service and SWIFT compatible services. Benefits of using an object-based storage service include:
- Data is kept safe and does not have to be independently backed-up
- Storage is easily scalable, with the ability for data to grow to practically any size
- You only pay for what you use; you do not need to buy expansion room in advance
- Storage service providers often have multiple tiers available, helping to reduce the cost of storing data
- Data storage and retrieval times may be improved, as storage service providers typically have more bandwidth than individual sites
- Your company, institution or facility may receive some storage capacity for free which you could use
Object storage is particularly useful for archiving data, as it typically provides a convenient, accessible method of storing data which may need to be shared with a wide group of individuals.
Hint
Storage services that are compatible with standard protocols such as S3 and SWIFT should be compatible with the tools provided on an Alces Flight cluster. Configure the service address or Authentication Endpoint appropriately for your chosen storage provider in order to use third-party services.
Using alces storage commands
Your Flight Compute cluster includes command-line tools which can be used to enable access to existing AWS S3, Swift and Dropbox accounts. Object storage services which are compatible with S3 or Swift can also be configured. For example - a Ceph storage platform with a compatible RADOS-gateway can be accessed using S3 support. To enable access to these services, users must first enable them with the following commands:
alces storage enable s3- enables AWS S3 servicealces storage enable swift- enables Swift servicealces storage enable dropbox- enables Dropbox service
Note
The enabled & available storage types can be viewed with alces storage show & alces storage avail respectively.
Once enabled, a user can configure one or more storage services for use on the command-line, giving each one a friendly name to identify it. The syntax of the command is shown below:
alces storage configure <friendly-name> <type-of-storage>
For example; to configure access to an AWS S3 account using the access and secret key, the following commands can be used:
[alces@login1(scooby) ~]$ alces storage configure my-s3area1 s3
Display name [my-s3area1]:
Access key: PZHAA6I2OEDF9F2RQS8Q
Secret key: ********************
Service address [s3.amazonaws.com]:
alces storage configure: storage configuration complete
Note
If using a Ceph filesystem with a RADOS-gateway, enter the hostname of your gateway service as the Service address configuration item. For Amazon S3 based storage, choose the default service address.
To configure access to a Swift compatible storage service, enter your username, API key and endpoint URL for the service. Please contact your storage service administrator to obtain these values; e.g.
[alces@login1(scooby) ~]$ alces storage configure my-swift swift
Display name [my-swift]:
Username: SLOS9275161
API key: ********************
Authentication endpoint: https://lon02.objectstorage.softlayer.net/auth/v1.0/
alces storage configure: storage configuration complete
When configuring a Dropbox account, the user is provided with a URL that must be copied and pasted into a browser session on their local client machine:
[alces@login1(scooby) ~]$ alces storage configure mydb dropbox
Display name [mydb]:
Please visit the following URL in your browser and click 'Authorize':

  https://www.dropbox.com/1/oauth/authorize?oauth_token=bdD4e2V2rjTf752u

Once you have completed authorization, please press ENTER to continue...
Copy the URL provided into your browser on your client system - you will be prompted to login to Dropbox (if you don’t already have a session); click on the Authorize button on the next screen to allow your Flight Compute cluster to access the files stored in your Dropbox account.
Once you have set up one or more configurations, you can switch between the different storage spaces using the following commands:
[alces@login1(scooby) ~]$ alces storage use my-s3area1
alces storage use: storage configuration 'my-s3area1' now set as default
From the command-line, users can upload and download data from their configured storage areas. To upload data to an object storage area, use the alces storage put <local-file> <object-name> command; e.g.
[alces@login1(scooby) ~]$ alces storage put mydatafile datafile-may2016
alces storage put: mydatafile -> datafile-may2016

[alces@login1(scooby) ~]$ alces storage ls
2012-08-23 17:08        DIR   Public
2016-05-14 16:10       1335   datafile-may2016
2012-08-23 17:08     246000   Getting Started.pdf

[alces@login1(scooby) ~]$
To download data from an object storage service, use the alces storage get <object-name> <local-file> command; e.g.
[alces@login1(scooby) ~]$ alces storage get "Getting Started.pdf" instructions.pdf
alces storage get: Getting Started.pdf -> /home/alces/instructions.pdf

[alces@login1(scooby) ~]$ file instructions.pdf
instructions.pdf: PDF document, version 1.4

[alces@login1(scooby) ~]$
Users can also create new buckets in their object-storage service using the alces storage mb <bucket-name> command, and then put objects into the new bucket; e.g.
[alces@login1(scooby) data]$ alces storage mb newdata
alces storage mkbucket: created bucket newdata

[alces@login1(scooby) data]$ alces storage put datafile2 newdata/datafile2
alces storage put: datafile2 -> newdata/datafile2

[alces@login1(scooby) data]$ alces storage ls newdata
2016-05-14 16:14   20971520   datafile2

[alces@login1(scooby) data]$
Users can also recursively transfer entire buckets (including any buckets contained within) using the -r option to the alces storage command; e.g.
[alces@login1(scooby) ~]$ alces storage put -r datadir datadir2
alces storage put: datadir/datafile2 -> datadir2/datafile2
alces storage put: datadir/datafile3 -> datadir2/datafile3
alces storage put: datadir/datafile4 -> datadir2/datafile4
alces storage put: datadir/datafile5 -> datadir2/datafile5
alces storage put: datadir/datafile6 -> datadir2/datafile6

[alces@login1(scooby) ~]$
Note
As well as being able to recursively put entire directories from a local path into the remote storage target, users can also get and rm directories recursively, again using the -r or -R option with their alces storage command.
Saving data before terminating your cluster
When you’ve finished working with your Alces Flight Compute cluster, you can select to terminate it in the console for your Cloud service. This will stop any running instances and wipe the shared storage area before returning the block storage volumes back to the provider. Before you shutdown your cluster, users must ensure that they store their data safely in a persistent service, using one of the methods described in this documentation. When you next launch a Flight Compute cluster, you can restore your data from the storage service to begin processing again.